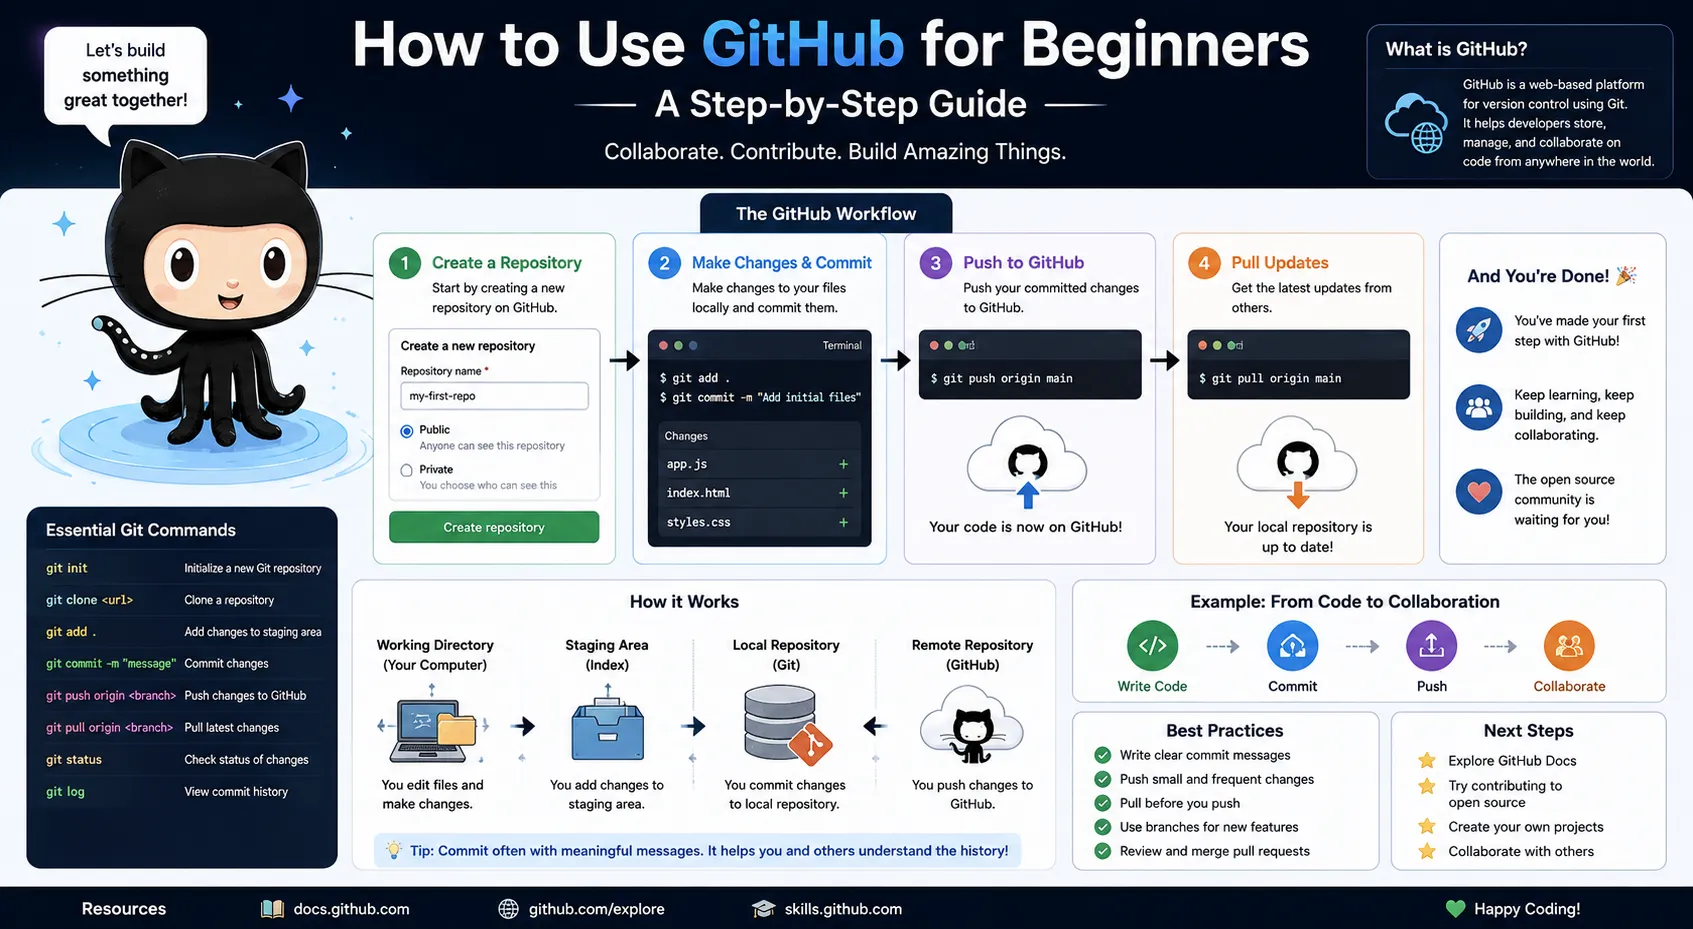
GitHub has become an essential tool for developers worldwide. Whether you’re working solo or collaborating in a team, understanding GitHub will boost your productivity and help manage your projects efficiently. If you’re new to GitHub, this step-by-step guide will walk you through the basics to get you started.
What is Git and GitHub?
Git is a powerful version control system that helps developers track changes in their code over time. It allows you to save different versions of your projects, compare changes, and revert to previous versions if needed. Git works locally on your computer to manage your project history efficiently.
GitHub is a cloud-based platform that uses Git to help you store, track, and manage your code projects online. It enables multiple developers to collaborate seamlessly by sharing repositories, tracking changes, and maintaining different versions of a project in a centralized place accessible from anywhere.
Step 1: Create a GitHub Account
- Go to github.com and click Sign Up.
- Enter your username, email, and create a strong password.
- Choose your plan (the free option is perfect for beginners).
- Verify your email and log in.
Step 2: Set Up Git Locally
To work with GitHub on your computer, you need Git installed:
- Download Git from git-scm.com.
- Install it following the instructions for your OS.
- Open your terminal (Command Prompt or Git Bash).
Configure Git with your name and email:
bash
git config –global user.name “Your Name”
git config –global user.email “your.email@example.com”
Step 3: Create a New Repository on GitHub
- After logging in, click the + icon in the top-right corner.
- Select New repository.
- Enter a repository name (e.g., my-first-project).
- Add an optional description.
- Choose Public or Private.
- Click Create repository.
Step 4: Clone the Repository to Your Local Machine
Cloning means copying the remote repo to your computer:
- On your repo page, click Code > copy the URL.
In your terminal, run:
bash
git clone https://github.com/your-username/my-first-project.git
- This downloads your project folder.
Step 5: Make Changes and Commit
- Open the project folder in your code editor (like VS Code).
- Make any changes or add new files.
- Save your changes.
Go back to the terminal, navigate into your project folder, and check the status:
bash
git status
Stage the changes:
bash
git add .
Commit the changes with a message:
bash
git commit -m “Add initial project files”
Step 6: Push Changes to GitHub
Push your committed changes to the remote repo:
bash
git push origin main
- Now, your changes are live on GitHub.
Step 7: Create a Branch (Optional)
Branching helps you work on new features without affecting the main code:
Create a new branch:
bash
git checkout -b new-feature
- Work and commit on this branch.
Push the branch:
bash
git push origin new-feature
- On GitHub, create a Pull Request to merge it into main.
Final Tips for Beginners
If you’re learning how to use GitHub for beginners, keep these tips in mind:
- Use descriptive commit messages.
Pull latest changes before pushing:
bash
git pull origin main
- Explore GitHub’s interface: issues, wiki, project boards.
- Practice regularly by creating small projects.
Ready to master GitHub? Join Aryu Academy’s full-stack development courses to build real-world projects with hands-on Git and GitHub experience.